Isns сервер что это
How to install and configure an iSNS server on Windows 2012 R2
Posted: June 19th, 2015

iSNS (Internet Storage Name Service) is a protocol that allows automatic discovery, management and configuration of iSCSI devices. In a nutshell, it’s like DNS for iSCSI devices.
It can be useful to speed up client configuration when you have many iSCSI targets.
It’s very easy and quick to set up. Just a few steps and you’ll be ready.
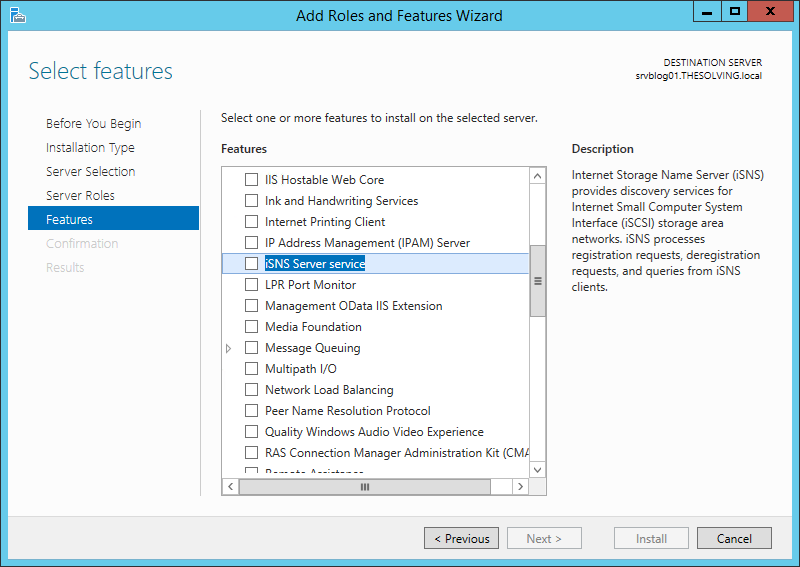
Install the iSNS Server service feature from the Add Roles and Features Wizard:
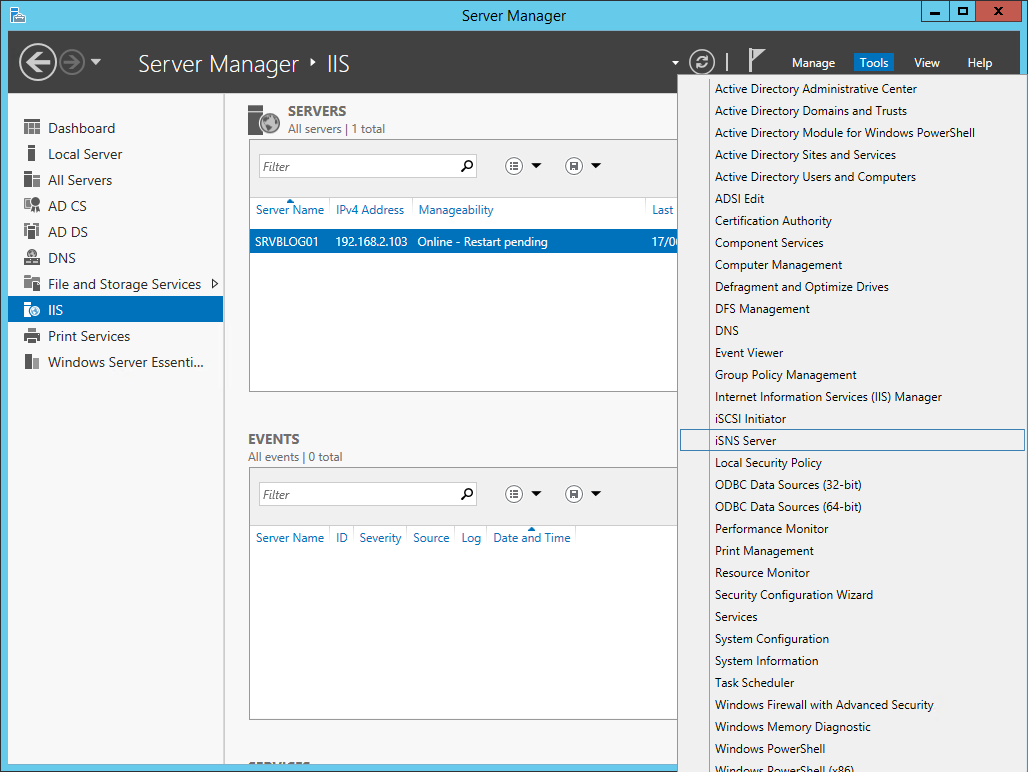
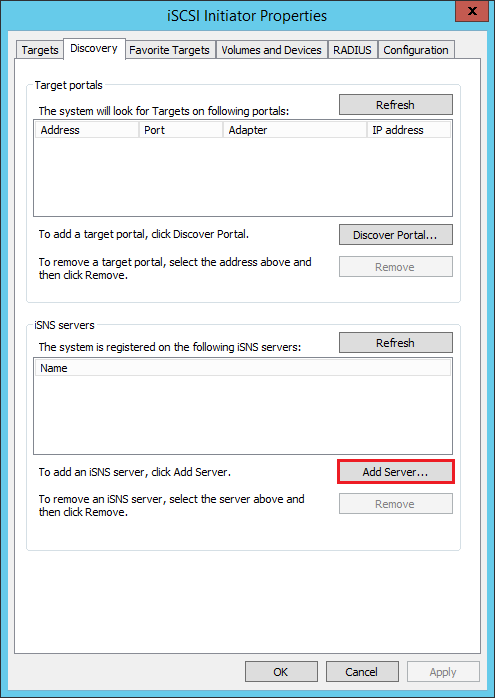
After the completion of the installation open the iSNS Server panel:
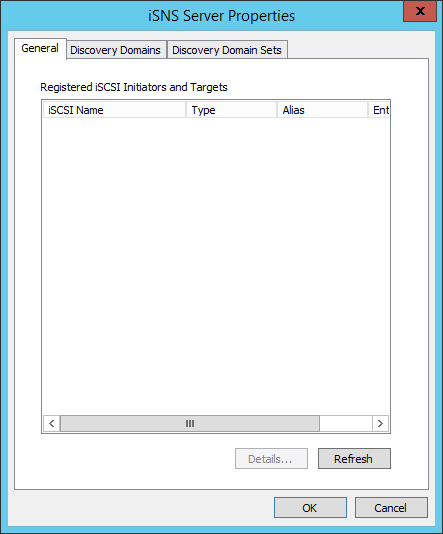
You won’t see any device yet, even if there are many iSCSI targets and initiators in your local network:
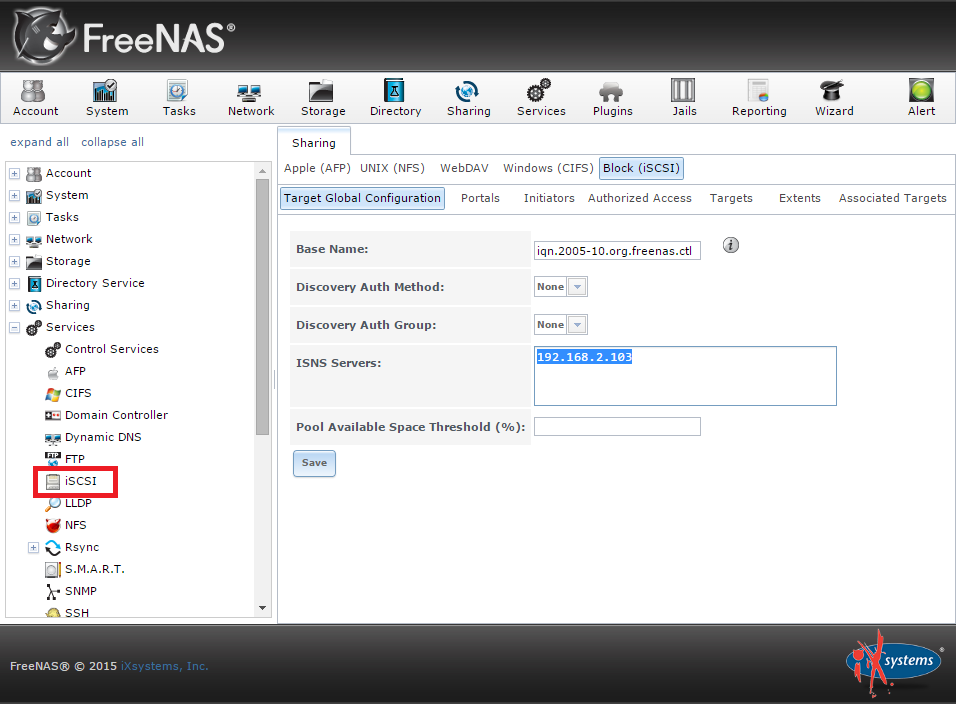
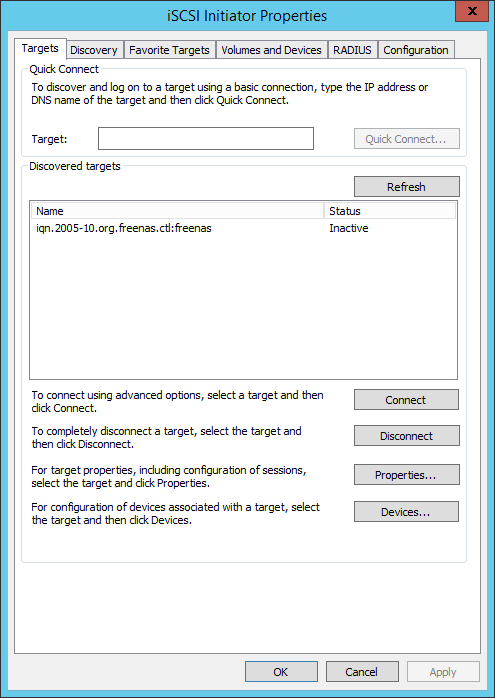
You need to specify the IP address of the iSNS server in your iSCSI devices in order to make them appear in the iSNS Server panel. In this example we are specifying the iSNS server for a FreeNAS iSCSI target:
You also need to connect your initiators to the iSNS server to take advantage of the discovery functionalities:

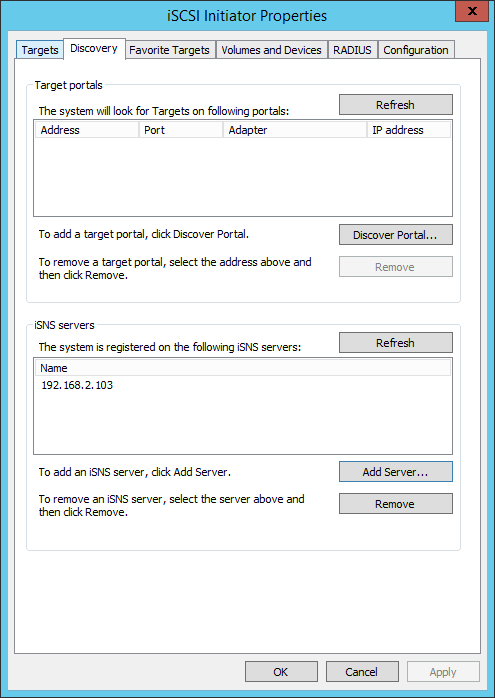
As you can see from the screenshot below, the initiator is now automatically detecting the iSCSI target:
From the iSNS Server panel you can now see the connected devices:
Internet Storage Name Service
The Linux SCSI Target Wiki

The proposed Internet Storage Name Service (iSNS) protocol allows automated discovery, management and configuration of LinuxIO devices on a TCP/IP network across multiple discovery domains and discovery domain sets (optionally using iFCP gateways).
The service can be conceptualized as «DNS for SANs.» FCoE, Fibre Channel, iSCSI, or iSER then provide the storage, TPG, and Network Portal objects for the Initiator and LinuxIO nodes respectively.
iSNS provides management services similar to those found in Fibre Channel networks, allowing a standard IP network to operate in much the same way that a Fibre Channel SAN does. Because iSNS is able to emulate Fibre Channel fabric services and manage both iSCSI and Fibre Channel devices, an iSNS server can be used as a consolidated configuration point for an entire storage network. However, standards-compliant iSNS implementations are required to support the iFCP protocol, supporting the iSCSI protocol is optional.
RFC 4171 Section 4.2 (iSCSI Object Model Diagrams) describes two implementations, including an advanced object model that is required for active-active high availability.
Components
The iSNS standard defines four components:
The iSNS Protocol iSNSP is a protocol that specifies how iSNS clients and servers communicate. It is intended to be used by various platforms, including switches and targets as well as server hosts. iSNS Clients iSNS clients are part of iSNSP aware storage devices. iSNS clients initiate transactions with iSNS servers using the iSNSP, register device attribute information in a common Discovery Domain (DD), download information about other registered clients and receive asynchronous notification of events that occur in their DD(s). iSNS Servers iSNS servers respond to iSNS protocol queries and requests made by iSNS clients using the iSNSP. iSNS servers initiate iSNSP State Change Notifications and store properly authenticated information submitted by a registration request in an iSNS database. iSNS Databases iSNS databases are the information repositories for iSNS server(s). They maintain information about iSNS client attributes; while implementations will vary, a directory-enabled implementation of iSNS, for example, might store client attributes in an LDAP directory. iSNS Control Node Client an iSNS control node client can facilitate administrative operations. Multiple implementations exist.
Control Node Client
There is no need to setup an iSNS Control Node Client in order to run the iSNS server with non-control node clients. Without an iSNS Control Mode Client, this will start the daemon and accept clients into the the Default Discovery Domain:
CentOS 5 (i386 & x86_64) client and server builds are available from the LIO iSNS repository.
There is long-term interest to provide iSNS using software RFC 4171 heartbeat (implemented by the original author, and still present today). Also, a long-term option is using LIO T/I mounts using Linux/HA H+A with iSNS server as a cluster resource.
iSNS client scripts
The iSNS Control Client from LIO is directly based on the Linux/iSNS Project. Additional iSNS control client functionality and scripts have been included. The iSNS control client is stable, and is currently being used on Linux-IO.
- Obtain a list of both Initiator nodes+alias: /sbin/isns_initiators
- Obtain a verbose list of iSCSI nodes+alias+portals+EIDs: /sbin/isns_iscsi_index
- Obtain a verbose list of LIO nodes+alias+portals: /sbin/isns_network_portals
- Determine if the local Initiator node has a valid EID: /sbin/isns_initiator_node_status
- Determine if the local LIO node has a valid EID: /sbin/isns_target_node_status
- Obtain a verbose list of Initiator and LIO nodes+alias+portals: /sbin/isns_nodes
- Register both Initiator and LIO nodes from an ISNS Server: /sbin/isns_register
- Deregister both Initiator and LIO nodes from an iSNS Server: /sbin/isns_deregister
- Update Network Portal Information based on LIO stack settings (target only): /sbin/isns_update_portals
- Deregister and register both Initiator and LIO nodes from an iSNS Server: /sbin/isns_reregister
iSNS Control Node Client scripts
- Check whether the associated iSCSI node is a control node: /isns/isns_is_control_node
- Check whether the associated iSCSI node is registered with the Server: /isns/isns_is_node_registered
- List all iSCSI nodes in the database: /isns/isns_list_nodes_all
- List details of the iSCSI node: /isns/isns_list_node_detail
- List all iSCSI nodes of a discovery domain: /isns/isns_list_dd_members
- List all discovery domains: /isns/isns_list_dd_all
- Create a discovery domain: /isns/isns_create_dd
- Delete a discovery domain: /isns/isns_delete_dd
- Add an iSCSI node to a discovery domain: /isns/isns_add_node_to_dd
- Remove an iSCSI node from a discovery domain: /isns/isns_remove_node_from_dd
- List details of the discovery domain set: /isns/isns_list_dds_members
- List all discovery domain sets: /isns/isns_list_dds_all
- Create a discovery domain set: /isns/isns_create_dds
- Delete a discovery domain set: /isns/isns_delete_dds
- Enable a discovery domain set: /isns/isns_enable_dds
- Disable a discovery domain set: /isns/isns_disable_dds
- Add a discovery domain to a discovery domain set: /isns/isns_add_dd_to_dds
- Remove discovery domain from a discovery domain set: /isns/isns_remove_dd_from_dds
- The scripts are meant to be used by the iSNS GUI for managing control nodes.
- String arguments which contain spaces must be enclosed in double quotes.
The sourcecode is available from the iSNS repository (see also README). It should build on any 2.4 or 2.6 Linux machine. Also, there is code to support other build platforms aside from the original Linux/iSNS sourcecode.
This original single threaded iSNS server design has been stable for some time, and suffices for moderate loads on modern iSNS clients. linux-iscsi.org allows to buld these RPMs for a simple iSNS server today. The original iSNS server by IPS TWG was licensed under a BSD license, and the new linux-iscsi.org version is also available under a BSD license.
The new iSNS server code still requires work to fully achieve production quality. E.g., the completion of asynchronous event handling on both client and server is an ongoing effort by numerous parties. A number of Linux vendors have been working on implementing iSNS functionality in their products, too. Examples for configurations of these implementations can be posted here as a community resource.
The following example is based on the Sony PlayStation 3 with Fedora Core 5.
The resultng .make_autoconfig file should look as follows (some of the resulting output has been removed for simplicity):

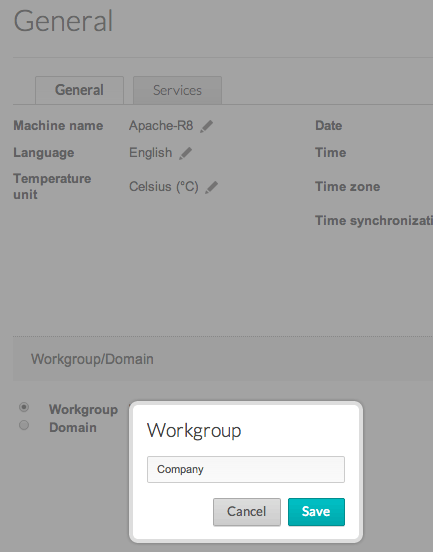
General tab
- Machine Name: The machine name identifies the Seagate NAS OS device on your network. You can change it from the default by passing the cursor to the right of the name. Choose pencil icon when it appears and enter a new name.
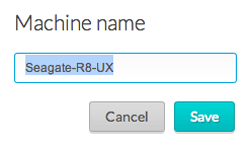

The machine name is limited to 15 characters and case-sensitive. Use alphanumeric characters without spaces or symbols. If a NAS OS device is connected to the network with a name that already exists, an alternate name is automatically created to avoid conflicts. For example, a second Seagate 8-bay Rackmount NAS on your network will automatically be called Seagate-R8-1 if Seagate-R8 is present. - Date: The date and time are set automatically if you assign an NTP server (see below). If NTP is not selected, you can change the date by passing the cursor to the right and choosing the pencil icon.
- Language: Pass the cursor to the right and choose the pencil icon to change the NAS OS language.
- Time: If the NTP server does not set the time, pass the cursor to the right and choose the pencil icon.
- Temperature unit: To change the unit, pass the cursor to the right and choose the pencil icon.
- Time zone: Pass the cursor to the right and select the pencil icon. You can choose your time zone from the drop-down window.
- Time synchronization: Sync the time and date with an NTP (network time protocol) server. NTP will automatically adjust the time settings for daylight savings.
Your NAS can join a Windows Workgroup or a Windows Active Directory:
- Workgroup: Select the radio button for Workgroup and choose the pencil icon to type its name (use from 1 to 15 alphanumeric characters).
- Domain: Select the radio button for Domain to join a Windows Active Directory on your network (see the next paragraph for instructions on entering your Active Directory credentials). Joining an Active Directory allows the administrator to import existing users and groups, foregoing the need to re-enter credentials.
Active Domain Troubleshooting: The information below provides general information on joining and leaving a domain. For additional information, see Getting Help.
Connect to an Active Directory
- Select the Domain radio button.
- At the prompt, fill in the Fully-qualified domain name, Administrator login, and Administrator password. For more complex network configurations, choose the Advanced Criteria arrow and fill in the Server name and Server IP fields.
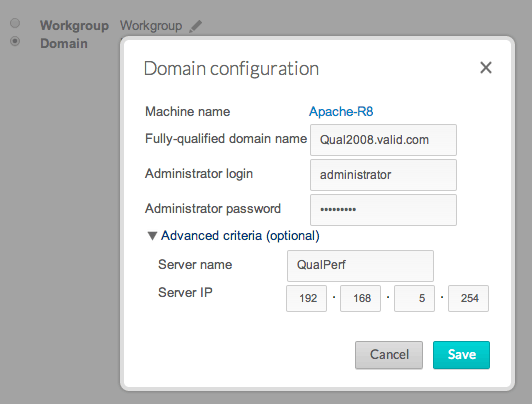
- Once connected, you can import users from the domain on the NAS OS Users page.
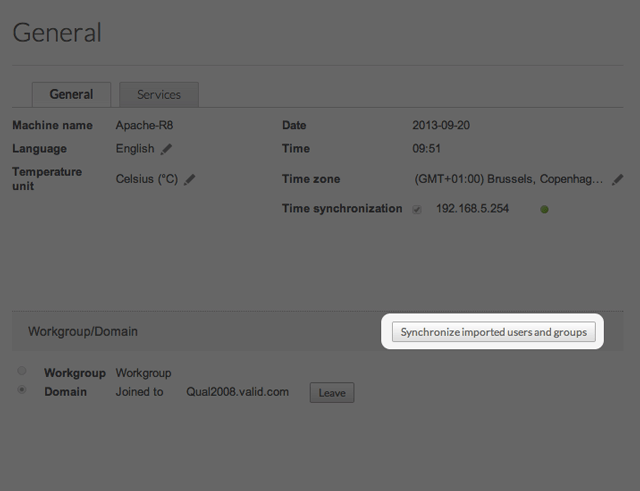
Synchronize Users/Groups
Except for access rights to shares on the NAS OS device, the domain’s administrator manages users and groups imported from a domain. If a user’s/group’s account has been changed by the domain administrator within the Windows Active Directory server (e.g. password revision, deleted from the domain, etc.), you can update the account in NAS OS by choosing the button Synchronize imported users/groups.
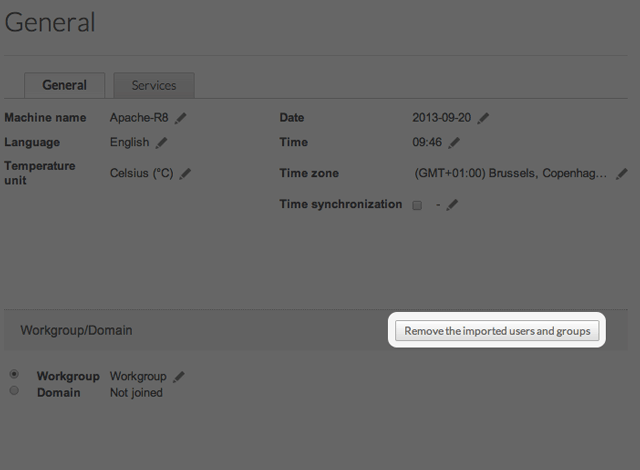
Leave the domain
To remove the NAS’s connection to a domain:
- Choose the Leave button.
- Authenticate by entering the domain administrator’s username and password.
- Users and groups that were imported may still be listed in Users and Groups. To remove all imported users and groups from the NAS, choose the button Remove the imported users/groups (this button replaces Synchronize imported users/groups once you leave a domain).
Services tab
This tab provides a list of file protocols and application services available to the NAS OS device. Based upon the needs of users, the administrator can choose to maintain certain services while leaving others turned off. Examples:
- The administrator may wish to turn AFP (Apple Filing Protocol) off if there are no Macintosh computers on the network.
- The administrator can enable the FTP service in order to provide access to the NAS via a third-party FTP application. See FTP for details.
Serviceactivation
There are three levels of service activation:
- Enable/disable
- Global service activation
- Share protocols
The Services tab allows you to manage the settings for enable/disable and global service activation. The share protocols are managed per share on the Shares page.
In all cases, enabling/disabling a service will override global service activation and share protocols. If a service is enabled, a green light will appear in the Status column. Not all services are enabled by default.
To disable a service, pass the cursor to the far right of its row to make the Edit pull-down menu visible and choose Disable.
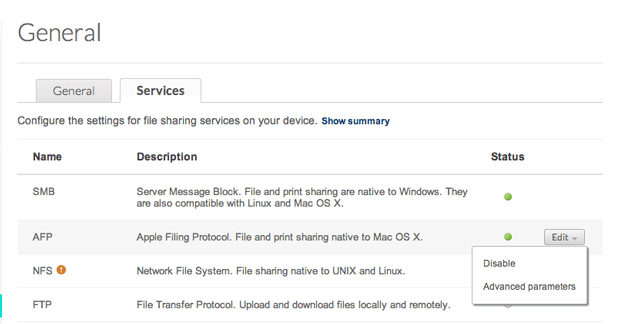
Perform the same action to Enable a service.
To view the Global service value, select the Edit pull-down menu and choose Advanced parameters. The pull-down menu allows you to deactivate/activate the global service value.
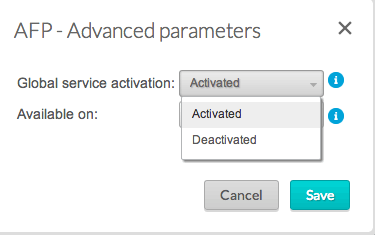
The global service level is, by default, set to Activated. This means that the service is ready for use by all shares as long as it is enabled. An administrator can also choose to deactivate a service at the global service activation level while enabling it. Doing so allows the administrator to limit the service to individual shares by adjusting the protocol value in Shares. For example, the administrator may wish to limit the Time Machine service to a single share that is only available to a Mac on the network.
See the table below for examples of service settings:
Internet Storage Name Service
Internet Storage Name Service (iSNS) (Служба имён хранилищ Интернета) — сетевой протокол, позволяющий автоматизировать открытие, управление и конфигурирование ISCSI и Fibre Channel устройств (с использованием iFCP шлюзов) в TCP/IP сетях.
Протокол iSNS описывается в RFC 4171.
Содержание
Особенности
iSNS предоставляет управление сервисами аналогично тем, которые имеются в семействе Fibre Channel, что позволяет для стандартной IP сети работать во многом таким же образом, как работает в Fibre Channel сеть хранения данных. Из-за того, что iSNS способен эмулировать фабрику сервисов Fibre Channel, и управлять как ISCSI, так и Fibre Channel устройствами, iSNS сервер может быть использован в качестве объединяющего пункта для всей сети хранения. Хотя следует отметить, что стандартами iSNS является обязательным поддержка iFCP протокола, поддерживающего ISCSI.
Компоненты
Стандарт iSNS определяет четыре компонента [1] :
Протокол iSNSP
iSNSP это такой протокол, который определяет, каким образом клиенты и сервера iSNS общаются между собой. Он предназначен для использования на различных платформах, включая коммутаторы и конечные объекты. iSNSP основывается на сообщениях запросов и ответов, которые вместе формируют полную транзакцию.
Клиенты iSNS
iSNS-клиентами могут быть как устройства хранения данных, предоставляющие свои услуги по сети, так и компьютеры, пользующиеся (опосредованно через сети передачи данных) услугами сетевых устройств хранения данных. iSNS-клиенты взаимодействуют с iSNS-серверами по протоколу iSNSP.
- Устройства хранения данных (например iSCSI Target или FC Storage), используя протокол iSNSP, регистрируются на iSNS-сервере, предоставляя ему информацию об атрибутах устройства, в результате чего:
а) становятся членами Домена Обнаружения (Discovery Domain, DD); б) могут загрузить с iSNS-сервера информацию о других зарегистрированных устройствах хранения, в) могут получать от iSNS-сервера асинхронные уведомления о событиях, произошедших в их Домене Обнаружения (rfc4171, п.2.1.2.), г) могут обязаться уведомлять iSNS-сервер об изменениях своего состояния (доступности) (rfc4171, п.2.3.2.).
- Компьютеры, пользующиеся через сеть услугами устройств хранения данных (iSCSI-инициаторы), — получают от iSNS-сервера информацию о доступных в их Домене Обнаружения устройствах хранения данных, а также оповещения о появлении новых и удалении (недоступности) существовавших устройств хранения данных.
Серверы iSNS
iSNS серверы реагируют на запросы iSNS протокола, а также на запросы, сделанные iSNS клиентами, использующими iSNSP. iSNS серверы инициируют уведомления об изменениях в iSNSP и хранят информацию, надлежащим образом прошедшую проверку подлинности и представляющую собой заявку на регистрацию в базе данных iSNS [2] .
Базы данных iSNS
Базы данных iSNS это информационные хранилища (репозитории) для iSNS серверов. Они хранят информацию об атрибутах клиентов iSNS, причём каталоги хранения могут отличаться в зависимости от реализации iSNS, например, они могут хранить атрибуты клиента в каталоге LDAP.
iSNS обеспечивает четыре основных сервиса:
Регистрация имён и поиск ресурсов хранения данных
Сервис регистрации имён предоставляет всем объектам в сети возможность зарегистрироваться и опрашивать базы данных для поиска ресурсов хранения данных. Например, клиенты-инициаторы могут получить от iSNS сервера информацию о других инициаторах (например, iSCSI-инициаторах) и конечных объектах (например, iSCSI-целях (iSCSI Target)).
Исследование домена и авторизации
Администраторы могут использовать домены обнаружения для разделения устройств хранения данных на управляемые группы. Для этой группировки администраторы могут ограничивать авторизацию каждого узла в наиболее подходящей подсети, зарегистрированной в iSNS, что позволяет расширить сеть хранилищ данных за счет сокращения числа ненужных запросов на авторизацию путём ограничения времени, которое каждый узел тратит на установление входа в сеть.
Каждый узел может использовать Login Control для делегирования своего управления доступом и политики авторизации iSNS серверу. Такое делегирование призвано содействовать централизации управления доступом.
Основные уведомления об изменениях
Сервис уведомления об изменениях (SCN) позволяет серверам iSNS выдавать уведомления о каждом событии, которое затрагивает узлы хранения данных управляемой ими сети. Каждый клиент iSNS может зарегистрироваться для получения уведомлений от имени своих узлов хранения, и каждый клиент будет реагировать на это в соответствии со своими собственными требованиями и реализацией.
Двунаправленные отображения между Fibre Channel и ISCSI устройствами
Из-за того, что в базах данных iSNS сохраняются имена и поисковая информация об Fibre Channel и ISCSI устройствах, iSNS серверы способны хранить отображения Fibre Channel устройств к прокси-устройствам ISCSI в сети IP. Эти отображения может быть также сделаны и в противоположном направлении, что позволяет iSNS серверам хранить отображения ISCSI устройств к прокси-WWNs.
Напишите отзыв о статье «Internet Storage Name Service»
Примечания
- ↑RFC 4171
- ↑ Другие компоненты и усовершенствования
Литература
- RFC 4171 — Internet Storage Name Service (iSNS)
- [ostop.ru/win/platform/windows_server_2008/123-isns-server.html iSNS Server для Windows Server 2008 (OStop.ru)] (рус.)
- [technet.microsoft.com/ru-ru/library/cc725692(WS.10).aspx Добавление сервера iSNS в коммутирующую матрицу (Microsoft TechNet для Windows Server)] (рус.)
- [sourceforge.net/projects/linuxisns iSNS для iSNS Linux] (англ.)
- [doc.opensuse.org/products/draft/SLES/SLES-storage_sd_draft/isns.html iSNS for Linux — Storage Administration Guide (SLES / openSUSE)] (англ.)
Отрывок, характеризующий Internet Storage Name Service
– Кто же им не велел меня двадцать раз поймать? А ведь поймают – меня и тебя, с твоим рыцарством, все равно на осинку. – Он помолчал. – Однако надо дело делать. Послать моего казака с вьюком! У меня два французских мундира. Что ж, едем со мной? – спросил он у Пети.
– Я? Да, да, непременно, – покраснев почти до слез, вскрикнул Петя, взглядывая на Денисова.
Опять в то время, как Долохов заспорил с Денисовым о том, что надо делать с пленными, Петя почувствовал неловкость и торопливость; но опять не успел понять хорошенько того, о чем они говорили. «Ежели так думают большие, известные, стало быть, так надо, стало быть, это хорошо, – думал он. – А главное, надо, чтобы Денисов не смел думать, что я послушаюсь его, что он может мной командовать. Непременно поеду с Долоховым во французский лагерь. Он может, и я могу».
На все убеждения Денисова не ездить Петя отвечал, что он тоже привык все делать аккуратно, а не наобум Лазаря, и что он об опасности себе никогда не думает.
– Потому что, – согласитесь сами, – если не знать верно, сколько там, от этого зависит жизнь, может быть, сотен, а тут мы одни, и потом мне очень этого хочется, и непременно, непременно поеду, вы уж меня не удержите, – говорил он, – только хуже будет…
Одевшись в французские шинели и кивера, Петя с Долоховым поехали на ту просеку, с которой Денисов смотрел на лагерь, и, выехав из леса в совершенной темноте, спустились в лощину. Съехав вниз, Долохов велел сопровождавшим его казакам дожидаться тут и поехал крупной рысью по дороге к мосту. Петя, замирая от волнения, ехал с ним рядом.
– Если попадемся, я живым не отдамся, у меня пистолет, – прошептал Петя.
– Не говори по русски, – быстрым шепотом сказал Долохов, и в ту же минуту в темноте послышался оклик: «Qui vive?» [Кто идет?] и звон ружья.
Кровь бросилась в лицо Пети, и он схватился за пистолет.
– Lanciers du sixieme, [Уланы шестого полка.] – проговорил Долохов, не укорачивая и не прибавляя хода лошади. Черная фигура часового стояла на мосту.
– Mot d’ordre? [Отзыв?] – Долохов придержал лошадь и поехал шагом.
– Dites donc, le colonel Gerard est ici? [Скажи, здесь ли полковник Жерар?] – сказал он.
– Mot d’ordre! – не отвечая, сказал часовой, загораживая дорогу.
– Quand un officier fait sa ronde, les sentinelles ne demandent pas le mot d’ordre… – крикнул Долохов, вдруг вспыхнув, наезжая лошадью на часового. – Je vous demande si le colonel est ici? [Когда офицер объезжает цепь, часовые не спрашивают отзыва… Я спрашиваю, тут ли полковник?]
И, не дожидаясь ответа от посторонившегося часового, Долохов шагом поехал в гору.
Заметив черную тень человека, переходящего через дорогу, Долохов остановил этого человека и спросил, где командир и офицеры? Человек этот, с мешком на плече, солдат, остановился, близко подошел к лошади Долохова, дотрогиваясь до нее рукою, и просто и дружелюбно рассказал, что командир и офицеры были выше на горе, с правой стороны, на дворе фермы (так он называл господскую усадьбу).
Проехав по дороге, с обеих сторон которой звучал от костров французский говор, Долохов повернул во двор господского дома. Проехав в ворота, он слез с лошади и подошел к большому пылавшему костру, вокруг которого, громко разговаривая, сидело несколько человек. В котелке с краю варилось что то, и солдат в колпаке и синей шинели, стоя на коленях, ярко освещенный огнем, мешал в нем шомполом.
– Oh, c’est un dur a cuire, [С этим чертом не сладишь.] – говорил один из офицеров, сидевших в тени с противоположной стороны костра.
– Il les fera marcher les lapins… [Он их проберет…] – со смехом сказал другой. Оба замолкли, вглядываясь в темноту на звук шагов Долохова и Пети, подходивших к костру с своими лошадьми.
– Bonjour, messieurs! [Здравствуйте, господа!] – громко, отчетливо выговорил Долохов.
Офицеры зашевелились в тени костра, и один, высокий офицер с длинной шеей, обойдя огонь, подошел к Долохову.
– C’est vous, Clement? – сказал он. – D’ou, diable… [Это вы, Клеман? Откуда, черт…] – но он не докончил, узнав свою ошибку, и, слегка нахмурившись, как с незнакомым, поздоровался с Долоховым, спрашивая его, чем он может служить. Долохов рассказал, что он с товарищем догонял свой полк, и спросил, обращаясь ко всем вообще, не знали ли офицеры чего нибудь о шестом полку. Никто ничего не знал; и Пете показалось, что офицеры враждебно и подозрительно стали осматривать его и Долохова. Несколько секунд все молчали.
– Si vous comptez sur la soupe du soir, vous venez trop tard, [Если вы рассчитываете на ужин, то вы опоздали.] – сказал с сдержанным смехом голос из за костра.
Долохов отвечал, что они сыты и что им надо в ночь же ехать дальше.
Он отдал лошадей солдату, мешавшему в котелке, и на корточках присел у костра рядом с офицером с длинной шеей. Офицер этот, не спуская глаз, смотрел на Долохова и переспросил его еще раз: какого он был полка? Долохов не отвечал, как будто не слыхал вопроса, и, закуривая коротенькую французскую трубку, которую он достал из кармана, спрашивал офицеров о том, в какой степени безопасна дорога от казаков впереди их.
Настройка iSCSI инициатора в Windows
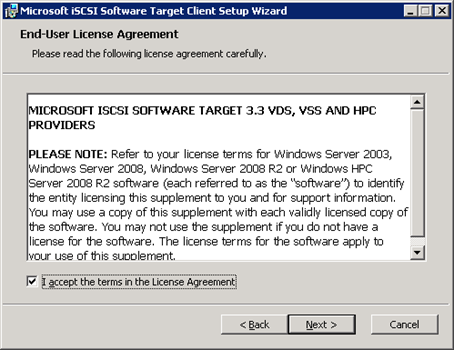
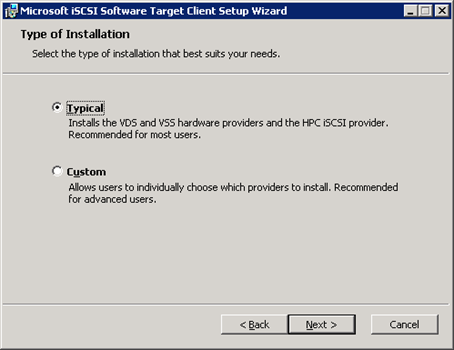
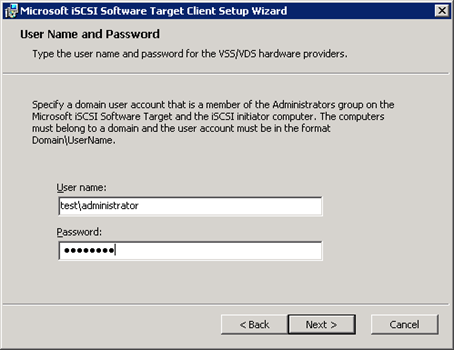
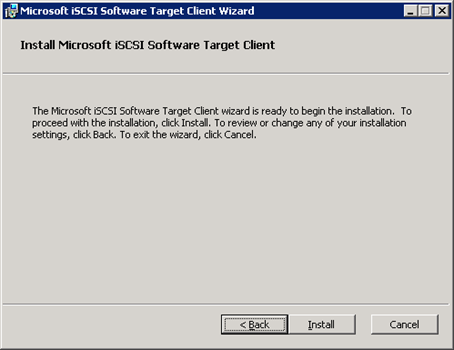
В предыдущей статье мы поговорили о том, как можно организовать iSCSI хранилище на Windows Server 2008 R2 с помощью пакета Microsoft ISCSI Target 3.3. Данная статья посвящена настройки iSCSI клиента (он называется iSCSI инициатор) на ОС семейства Windows.
Для работы с iSCSI target –ом (это сервер, предоставляющий услугу доступа к дисоквым ресурсам по протоколу iSCSI) с клиентской ОС нам необходимо иметь установленный и настроенный iSCSI инициатор.
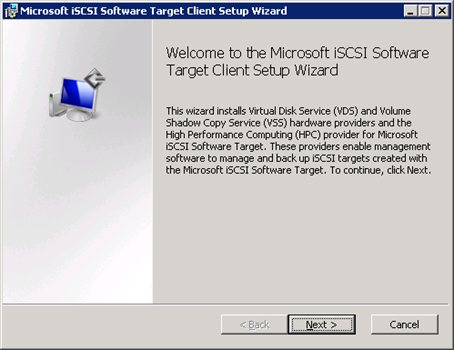
В ОС Windows Vista, Windows 7, Windows Server 2008 и 2008 R2 программный iSCSI инициатор уже установлен. Чтобы iSCSI initiator появился в Windows XP и Windows Server 2003, придется установить клиентскую часть (тот самый файл iscsitargetClient_public.msi, который мы получили в предыдущей части статьи). Мастер установки крайне прост и описывать его нет необходимости.
Запустим утилиту управления iSCSI initiator
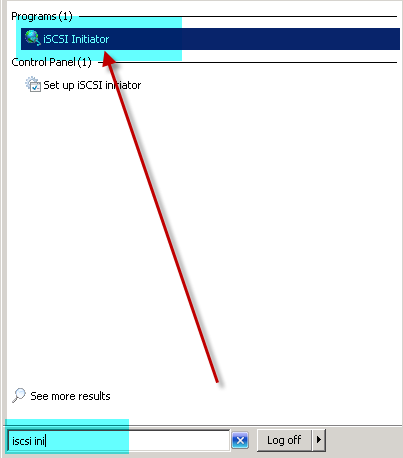
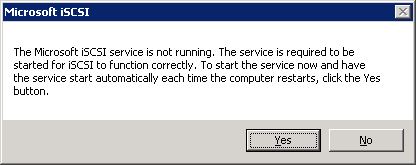
В том случае, если вы запускаете этот сервис впервые появится предупреждающее окно о необходимости запустить службу Microsoft iSCSI.
В поле Target нужно указать имя сервера с запущенной службой ISCSI Target и нажать кнопку Quick Connect.
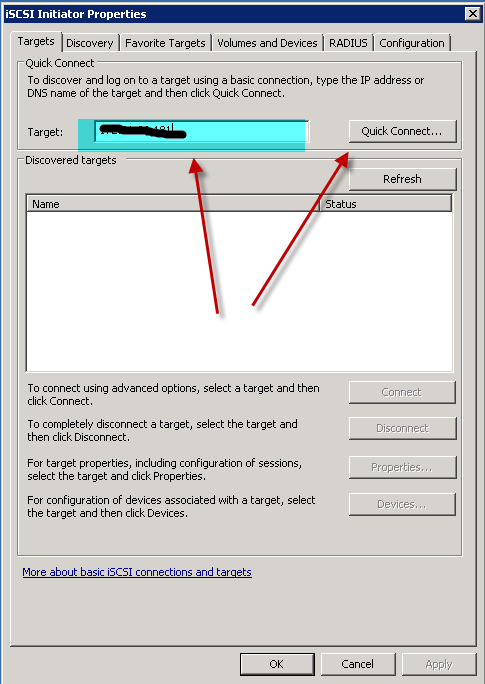
В появившемся окне будут отображен список всех таргетов, доступных по указанному адресу (в моем случае он один). Выберите его и нажмите Done

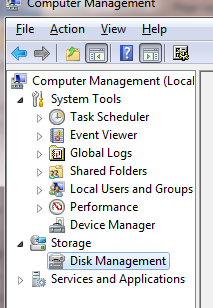
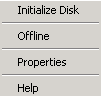
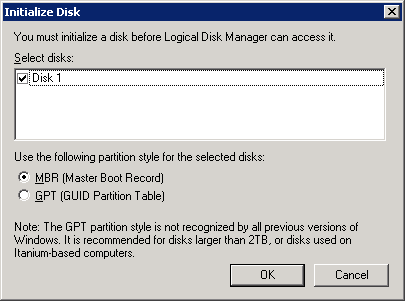
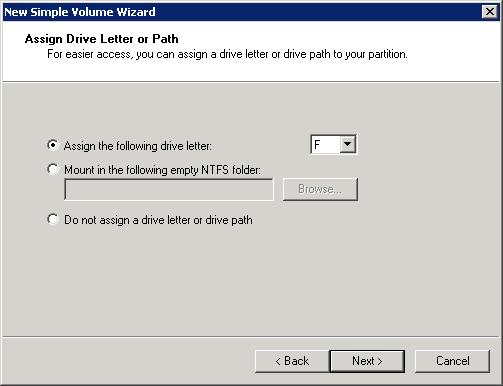
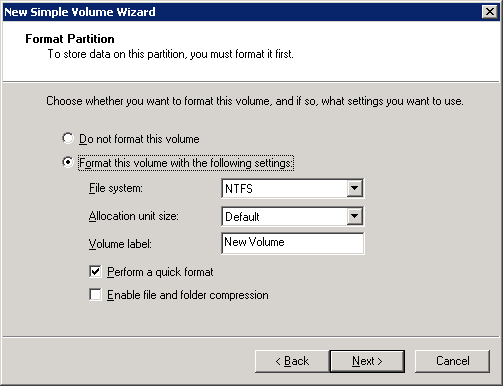
Затем перейдите в консоль управления дисками (Computer management->Storage->Disk Management) , где должен появиться новый диск. Необходимо инициализировать, отформатировать его и назначить ему букву диска.
После окончания всех операций на компьютере появится новый диск, с которым можно работать точно так же как с локальными дисками, реально же он располагается в сети на нашем сервере.